31/01/2017
Tensorflow II : convolutional NN
![]()
This time, we are going to go a bit further with the Tensorflow library. Our target is to be able to shape a convolutional neural network for image classification. Let’s see if we have better results on our dataset. In this chapter, we will also try to visualize the convolutional layers.
Before we begin, here is the link to the full version of the code : Github
The Github version is a bit more advanced than the one described in this tutorial (I began to implement Tensorboard features).
Convolutional Neural Networks are composed of several kinds of layers. Our network will be composed of one input layer (our images), followed by 2 convolutional networks, one flat layer, and 2 final fully connected layers.
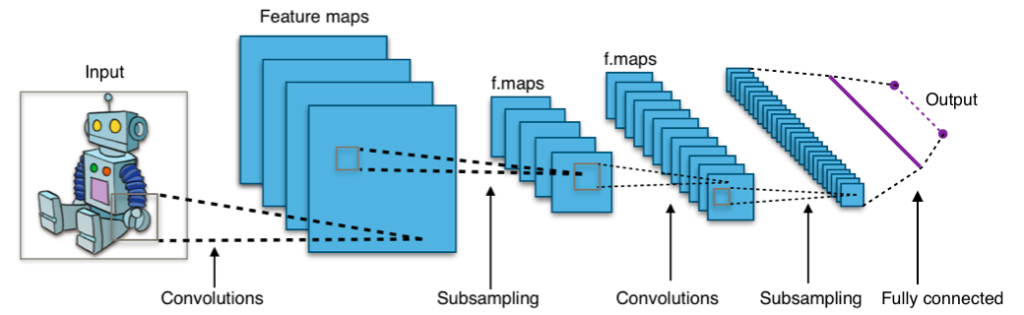
By Aphex34 [CC BY-SA 4.0 (https://creativecommons.org/licenses/by-sa/4.0)], from Wikimedia Commons
Dependencies
|
1 2 3 4 5 6 |
#dependencies import os import tensorflow as tf import numpy as np from numpy import array from PIL import Image |
Network and layers parameters
|
1 2 3 4 5 6 |
#network parameters learning_rate=0.08 #layers parameters img_size=120 flat_img_dim=img_size*img_size |
Building the layers
Similar to the deep neural network, we are going to build our layers step by step with functions. The first 2 functions we would like to have are the ones which create arrays of weights and biases for each layer of our network. Inputs of these functions will therefore be the shape of our layers. As usual, we initialize the weights randomly and biases to a positive constant. These functions can manage tensors of any dimension.
|
1 2 3 4 5 |
def create_weights(shape): return tf.Variable(tf.truncated_normal(shape,stddev=0.1)) def create_bias(length): return tf.Variable(tf.constant(0.1,shape=[length])) |
Convolution + maxpooling :
We are going to screen our input image with a kernel (a square of size ‘filter_size’). Firstly, we can build the weight tensor behind this kernel. The shape of the kernel is [filter_size,filter_size,num_input_channels,num_filters]. For example in the 1st convolutional layer, I am going to use a patch of 5×5 pixels and create 4 filters from it. There is only one input channel as our input is defined on a grayscale. So the shape of the kernel’s weights will be : [5,5,1,4]. We then apply this kernel (or patch) to the full image using a stride of 2 (in x and y).
If our input has shape [120,120,1] (this is the case for our dog and cat pictures) then the shape of our 1st convolutional layer will be [60,60,4]. If the 2nd convolutional layer has a stride of 2 and 10 filters, then the shape after our second convolution will be [30,30,10].
We can then apply max_pool and relu functions to the layer to finalize the construction of our convolutional layer (if the stride is 1, then we preserve the shape of the layer, if 2 then we divide it by 2,…)
|
1 2 3 4 5 6 7 8 |
def new_conv_layer(input,num_input_channels,filter_size,num_output_channels,use_pool=True): shape=[filter_size,filter_size,num_input_channels,num_output_channels] weights=create_weights(shape=shape) bias=create_bias(length=num_output_channels) layer=tf.nn.conv2d(input=input,filter=weights,strides=[1,1,1,1],padding='SAME')+bias if use_pool: layer=tf.nn.max_pool(layer,ksize=[1,4,4,1],strides=[1,2,2,1],padding='SAME') return layer,weights |
Flatten layer :
The input of this function is a convolutional layer. We will use the reshape function from Tensorflow to flatten it. In our example, our 2nd convolutional layer has a shape of [30,30,10]. We are going to flatten it to a vector of length [30x30x10]=[9000]. This is just a new way to rewrite our previous layer; we do not have any weights or bias attached to this layer.
|
1 2 3 4 5 |
def new_flatten_layer(layer): layer_shape=layer.get_shape() dimension=layer_shape[1:4].num_elements() layer=tf.reshape(layer,[-1,dimension]) return layer,dimension |
Fully connected layer :
Now that we have a layer which looks like a vector, we can apply the same technique that we did for deep neural network. Reduce little by little the quantity of neurons until we reach the size of our output (labels). We just use the classic formula Y=WX + b with the help of the tf.matmul function and create the weights and bias arrays associated with each layer.
|
1 2 3 4 5 6 7 |
def fc_layer(layer,num_input,num_output,use_relu=True): weights=create_weights(shape=[num_input,num_output]) bias=create_bias(length=num_output) layer=tf.matmul(layer,weights)+bias if use_relu: layer=tf.nn.relu(layer) return layer,weights |
Building the network
Now that we have functions which define every kind of layer, we can begin to build the model.
Initializing layers
|
1 2 3 4 5 6 7 8 9 10 11 12 13 14 15 16 |
X=tf.placeholder(dtype=tf.float32,shape=[None,flat_img_dim],name="X") Xm=tf.reshape(X,shape=[-1,img_size,img_size,1]) conv_layer1,conv_weights1=new_conv_layer(input=Xm,num_input_channels=1,filter_size=3,num_output_channels=18,use_pool=True) conv_layer2,conv_weights2=new_conv_layer(input=conv_layer1,num_input_channels=18,filter_size=3,num_output_channels=32,use_pool=True) flatten_layer,dimension=new_flatten_layer(layer=conv_layer2) fc_layer1,fc_weights1=fc_layer(layer=flatten_layer,num_input=dimension,num_output=124) fc_layer2,fc_weights2=fc_layer(layer=fc_layer1,num_input=124,num_output=2) Yth=tf.nn.softmax(fc_layer2) classes=tf.argmax(Yth,dimension=1) Yreal=tf.placeholder(dtype=tf.int32,shape=[None,2],name="Yreal") |
Cost function & Gradient descent
I am using cross entropy for the cost function and will use classic Gradient descent to minimize the loss.
|
1 2 3 |
cross_entropy=tf.reduce_mean(tf.nn.softmax_cross_entropy_with_logits(logits=Yth,labels=Yreal)) tf.summary.scalar('cross entropy',cross_entropy) #for tensorboard train_step=tf.train.GradientDescentOptimizer(learning_rate).minimize(cross_entropy) |
Training the network
We feed the network in batches of 50 random labelled pictures and let Tensorflow perform the minimization.
|
1 2 3 4 5 6 7 8 9 10 11 12 13 |
with tf.Session() as sess: merged=tf.summary.merge_all() writer=tf.train.SummaryWriter('C:/Users/Nicolas/Google Drive/website/python-tensorflow/src/graph',sess.graph) sess.run(tf.global_variables_initializer()) print('Training started...') for epoch in range(15000): permutation=np.random.permutation(19600) permutation=permutation[0:50] batch=[train_set[permutation],train_label[permutation]] summary,model,cost=sess.run([merged,train_step,cross_entropy],feed_dict={X:batch[0],Yreal:batch[1]}) writer.add_summary(summary,epoch) print(cost) print('Training finished.') |
Visualize the convolutional layers
Plotting convolutional layers :
|
1 2 3 4 5 6 7 8 9 10 11 12 13 |
def print_conv_layer(layer,image): feed_dict = {X: image,drop_value:1} values = sess.run(layer, feed_dict=feed_dict) num_filters = values.shape[3] num_grids = math.ceil(math.sqrt(num_filters)) fig, axes = plt.subplots(num_grids, num_grids) for i, ax in enumerate(axes.flat): if i<num_filters: img = values[0, :, :, i] ax.imshow(img, interpolation='nearest', cmap='binary') ax.set_xticks([]) ax.set_yticks([]) plt.show() |
We can then call this function on the testing set to visualize filtered pictures. Let’s print the convolution layer for the first image of the testing set. Each picture is filtered with the 18 filters.
|
1 |
print_conv_layer(conv_layer1,[test_set[0,:]]) |
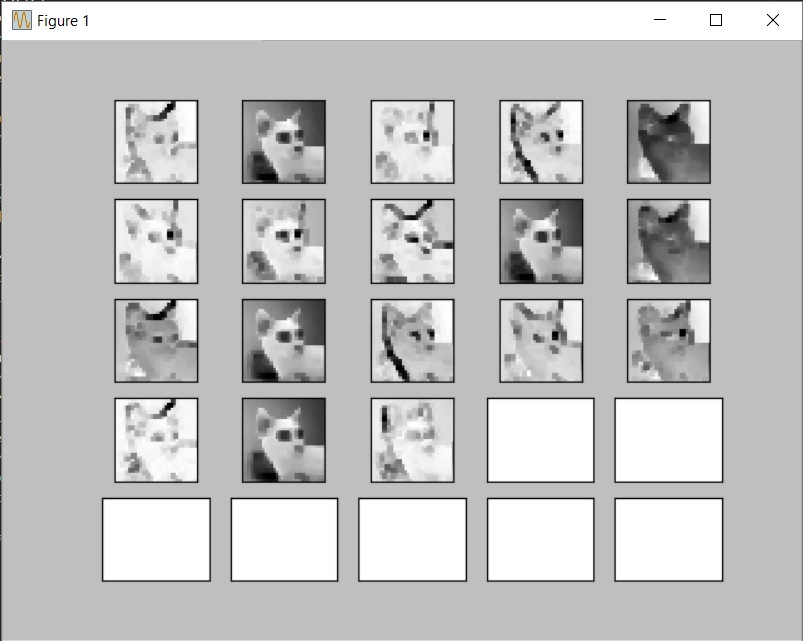
Visualizing the convolution layers could help us to understand how the network is making abstracts of the original pictures.
Conclusion
Convergence in machine learning is something precious and needs the full attention of the data scientist. We must take care of every little detail if we want to achieve good results. After thousands of running epochs, I finally could reach the following results :
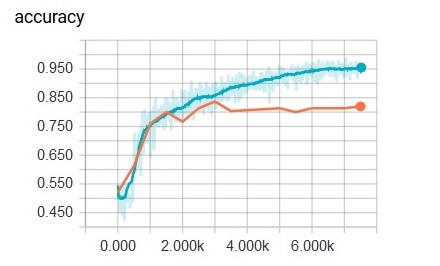
98% accuracy on the training set : convergence on the training set is quite good. The cross entropy value is low.
82% accuracy on the testing set : :s. We obviously have an overfitting issue!
Results are pretty good on the training set, the convergence of the cost function works better than with a deep neural network, but the accuracy on the training set remain high :82%, still a pretty bad result, isn’t it ? Nevertheless, we have achieved a nice improvement (formerly around 65% with DNN). We now must tackle the overfitting problem. One solution is to use a dropout function during the learning phase. However, there is limitation due to the poor process I applied on the pictures at the very beginning of our analysis (cropping + turn to grey). I will not go further in this tutorial. It was a good introduction to the Tensorflow library, now I need to tackle bigger / stronger / more complex projects.
What to do next?
So what can we do next to improve the accuracy and other figures? Well there are a bunch of things to take care of. Here is a list of ideas you could try to code and check if it has any effect on the final results :
- Implement learning rate decay. After a certain quantity of loops, the algorithm tends to struggle to converge more. Learning rate decay will help you to get closer to the local minima during the training loop.
- Take care of overfitting. Maybe our network struggle to generalize to new data, we could try to add a regularization term or implement a dropout method on the convolutional layers.
- Change the design of the network. We have a nice quantity of labelled data, which could allow us to add more convolutional layers in the network. But be careful, each layer you add will be a pain for your machine!
- Better treatment of raw data. I made a terrible decision at the very beginning of this project. I cropped every picture of the database to the center (hoped the animal face was there 100% of the time^^) and then reduced to 120×120 pixels image to finally remove all the colors channels. There is surely a better way to do this pre-processing.
- Implement new features in the network? Could we send other parameters (measured from the images) along with the image in order to feed the network?
Great sources of inspiration
Youtube video by a Tensorflow gourou
Great tutorial by Hvass-labs (he also has a youtube channel)
https://github.com/Hvass-Labs/TensorFlow-Tutorials/blob/master/02_Convolutional_Neural_Network.ipynb
Global explanation of what a CNN is (Stanford course)
http://cs231n.github.io/convolutional-networks/